Overview of Macro
In SCHLIX CMS, a macro is a piece of code that is executed before a text is sent for output to render an HTML page. For each of the view calls in an application or block, if the application calls processDataOutputWithMacro(array $data, string $function_name, array $extra_info), then the data, which is an associative array containing information such as id, title, text, etc will be processed and all macros with Active status will be executed. A macro may or may not have a view template, since it function can be different.
A macro is different from a block. A block needs to be called from the theme with method like \SCHLIX\cmsPageOutput::BlockCategory('block_name') before it can display any output, while a macro is usually triggered from a text display. A macro can also call a block so you can insert a block into an article dynamically.
Typical use cases of a macro
- Search and replace a specific text and transform it into something else (this is the most common use)
- Insert a gallery, a chart, a video, or an object in the middle of an article
- Insert a stock quote so readers can hover the mouse and see the chart instantly
- Prevent email address harvester from extracting email addresses by replacing them with obfuscated text with Javascript
- Article permission check
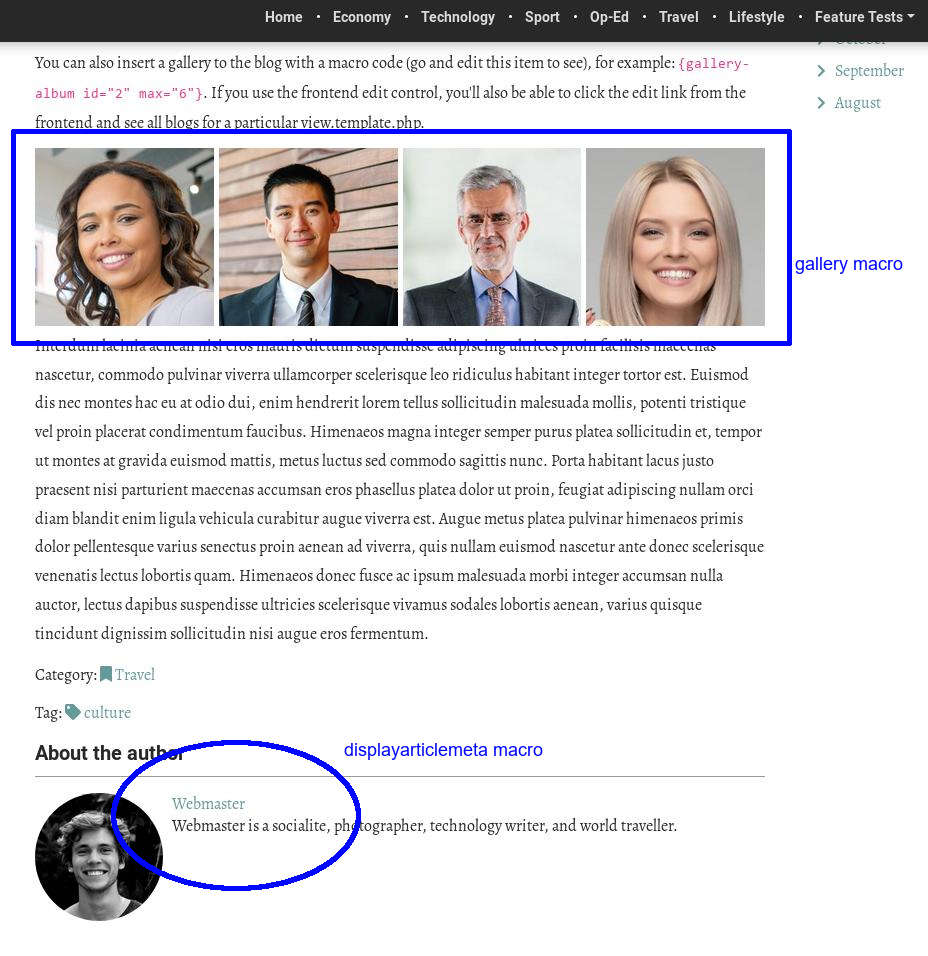
For example, there are 2 macros that changes the output of https://demo3.schlix.com/news/travel/borobudur.html. The first one is gallery macro, which purpose is to dynamically display pictures from a certain gallery album so when the picture is added/removed, it will automatically change as well. The gallery macro needs to be triggered by a keyword. The second macro is displayarticlemeta, which has no syntax since it's automatically called regardless.
In the backend, a website editor/owner only has to type a simple code string.

The purpose of a macro is to simplify editing and save time so that website editor doesn't have to insert HTML code manually. In the example above, if it's done manually without a macro, a website editor has to manually create the tags, and when the Javascript library that displays the lightbox is changed, the HTML tag needs to be modified manually. If there's a new picture in the album or if there's a deletion, the picture will need to be added/removed manually. With a macro, website owner/editor will save time from manual labour and the output will be generated dynamically as the data source are modified.
A website editor/owner will need to type a code (although it's not always the case). You can see the list of enabled macros in Macro Manager.
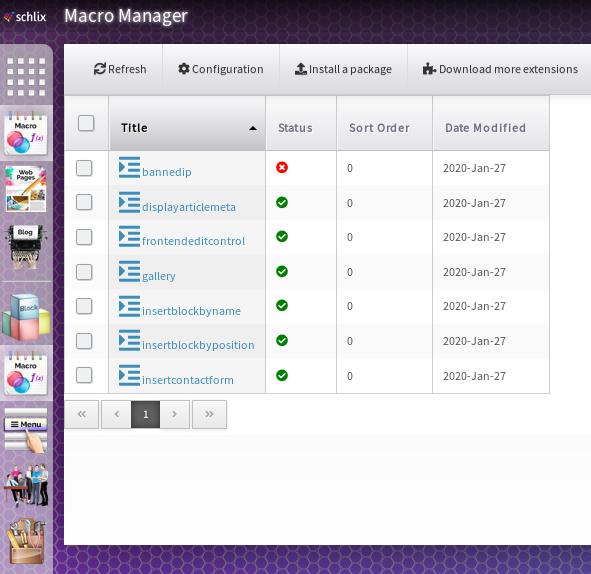
You can enable, disable, or restrict a macro to a specific application or block.

A macro may be visible or it maybe invisible and it could be triggered by anything. You can also enable or disable macro in your application template files (e.g. view.item.template.php, view.main.template.php, etc). For example, the snippet below is a typical view.item.template.php generated by Plugin Creator. If you remove the $item['macro_xxxxx'] then it won't be displayed.
<div class="app-page-item app-<?= $this->app_name; ?>" >
    <?= $item['macro_processed_text_outside_article_top'] ?>
    <article class="item" id="app-<?= $this->app_name; ?>-item-<?= $item[$this->field_id]; ?>">
        <!-- Page Title -->
        <?php if ($item_meta_options['display_pagetitle']): ?>
            <h1 class="item title" itemprop="headline"><?= ___h($item['title']); ?></h1>
        <?php endif; ?>
        <!-- End Page Title -->

        <!-- Macro - Pre -->
        <?php if ($item['macro_processed_text_before_article']): ?>
            <div class="meta before-article">
            <?= $item['macro_processed_text_before_article'] ?>
            </div>
        <?php endif ?>
        <!-- End Macro - Pre -->
        <!-- content -->
        <div class="text" itemprop="articleSection">
            <?= $item['summary'] ?>
            <?= $item['description'] ?>
        </div>
        <!-- end content -->
        <?php if ($item['macro_processed_text_after_article']): ?>
            <div class="meta after-article">
                <?= $item['macro_processed_text_after_article'] ?>
            </div>
        <?php endif ?>
    </article>
    <?= $item['macro_processed_text_outside_article_bottom'] ?>
</div>
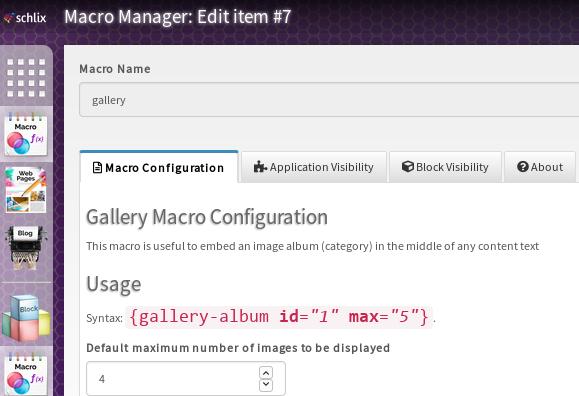
When you write a macro, you're the one who will determine the syntax of the macro. You will then need to parse the code and replace that text with the desired output. Consider, for instance, a macro that displays a gallery album with parameter id and max. Screenshot:
The following is a basic an example of a macro.
namespace Macro;

class ExtensionName extends \SCHLIX\cmsMacro {


    protected static $has_this_macro_been_called;
    /*
     * Run the macro
     * @global \SCHLIX\cmsHTMLPageHeader $HTMLHeader
     * @param array|string $data
     * @param object $caller_object
     * @param string $caller_function
     * @param array $extra_info
     * @return bool
     */
    public function Run(&$data, $caller_object, $caller_function, $extra_info = NULL) {
        global $HTMLHeader;

        // This is just an example macro
        switch ($caller_function)
        {
            case 'viewItemByID':   break;
            case 'viewCategoryByID':  break;
            case 'viewChildCategory':  break;
            case 'viewChildItem': break;
            case 'viewMainPage':  break;
            default:  break;
        }
	// Who's calling this?
        if (is_a($caller_object,'\\SCHLIX\\cmsApplication_Basic'))
        {
            $app_name  = $caller_object->getApplicationName();
            print_r($data); // what is the data that's passing through?
            $sanitized_xss_title = SAFE_HTML($data['title']);
            $HTMLHeader->Add('<meta property="og:title" content="'.$sanitized_xss_title.'" />');
            // ....
            $this->appendAfterArticleOuput($data, 'Test: after article output');

        } else if (is_a($caller_object,'\\SCHLIX\\cmsBlock'))
        {
            // ....
            //print_r($data);

        }
        // This is an example of how to make sure that this macro is only loaded once
        // because macros get called repeatedly if there's a "repeater" list item
        if (static::$has_this_macro_been_called != 'yes')
        {
            $HTMLHeader->JAVASCRIPT_EXTERNAL('https://cdnjs.cloudflare.com/ajax/libs/animejs/2.0.2/anime.min.js');

            static::$has_this_macro_been_called = 'yes';
        }
        // Get the value from config key 'bool_checkbox_example'
        if ($this->config['bool_checkbox_example'] == 1)
        {
            $this->appendBeforeArticleOuput($data, 'Test: before article output. Checkbox enabled');
        }
        $app_name = '';

        // $result = $this->loadTemplateFile('view.macro', $local_variables);

        return true;
    }


}
Example of the configuration keys in config.template.php:
<schlix-config:textbox config-key='str_example_1' label='<?= ___('Textbox Example') ?>' class='form-control' />
<schlix-config:textarea config-key='str_example_2' label="<?= ___('Textarea Example') ?>" class='wysiwyg' />
<schlix-config:textarea config-key='str_example_3' label="<?= ___('Non-WYSIWYG textarea example') ?>" class='form-control'  />

<schlix-config:integerbox config-key='int_integerbox_example' config-default-value="1" min="1" max="200"  label='<?= ___('Integer box example with default value') ?>' class='form-control' />

<schlix-config:checkbox config-key='bool_checkbox_example' label='<?= ___('Checkbox Example') ?>' />

<schlix-config:dropdownlist class="form-control" config-key="str_option_select" label="<?= ___('Dropdown list example') ?>" >
    <schlix-config:option value="0"><?= ___('Please select') ?></schlix-config:option>
    <schlix-config:option value="<?= SAFE_HTML('opt1') ?>"><?= SAFE_HTML('Option 1') ?></schlix-config:option>
    <schlix-config:option value="<?= SAFE_HTML('opt2') ?>"><?= SAFE_HTML('Option 2') ?></schlix-config:option>
    <schlix-config:option value="<?= SAFE_HTML('opt3') ?>"><?= SAFE_HTML('Option 3') ?></schlix-config:option>
</schlix-config:dropdownlist>

<schlix-config:radiogroup config-key="int_option_radio" label="<?= ('Radio group example') ?>">
    <schlix-config:option value="1"><?= SAFE_HTML('Option 1') ?></schlix-config:option>
    <schlix-config:option value="2"><?= SAFE_HTML('Option 2') ?></schlix-config:option>
    <schlix-config:option value="3"><?= SAFE_HTML('Option 3') ?></schlix-config:option>
</schlix-config:radiogroup>

<schlix-config:checkboxgroup config-key="int_option_checkbox" label="<?= ('Checkbox group example') ?>">
    <schlix-config:option value="1"><?= SAFE_HTML('Option 1') ?></schlix-config:option>
    <schlix-config:option value="2"><?= SAFE_HTML('Option 2') ?></schlix-config:option>
    <schlix-config:option value="3"><?= SAFE_HTML('Option 3') ?></schlix-config:option>
</schlix-config:checkboxgroup>